
| 일 | 월 | 화 | 수 | 목 | 금 | 토 |
|---|---|---|---|---|---|---|
| 1 | 2 | 3 | ||||
| 4 | 5 | 6 | 7 | 8 | 9 | 10 |
| 11 | 12 | 13 | 14 | 15 | 16 | 17 |
| 18 | 19 | 20 | 21 | 22 | 23 | 24 |
| 25 | 26 | 27 | 28 | 29 | 30 | 31 |
Tags
- androidx
- DART
- ChatGPT
- Firebase
- Gemini
- 명심보감
- 명언
- javascript
- Linux
- kotlin
- 파이썬
- Flutter
- ASMR
- 소울칼리버6
- Freesound
- gemini-cli
- 오늘의역사
- 공부집중
- 이모지메모
- 명언모음
- 명상명언
- FSM
- 코틀린
- Android
- 좋은글필사하기
- 생성AI
- Coroutine
- 오픈소스
- jetpack compose
- 장자명언
Archives
- Today
- Total
Vintage appMaker의 Tech Blog
[Flutter] BackdropFilter를 이용한 Blur 본문
Source code or Tip/Flutter & Dart
[Flutter] BackdropFilter를 이용한 Blur
VintageappMaker 2022. 7. 31. 09:31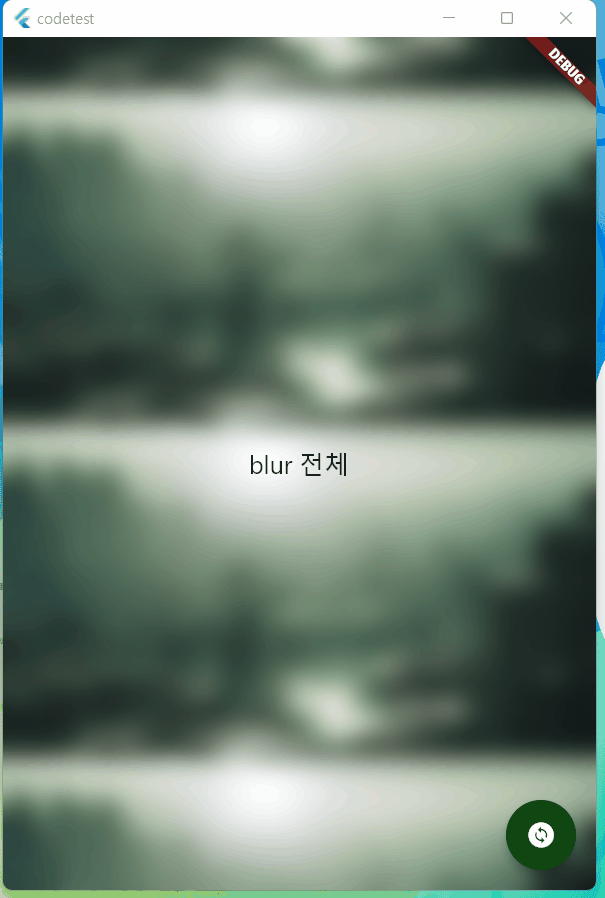
BackdropFilter class - widgets library - Dart API
A widget that applies a filter to the existing painted content and then paints child. The filter will be applied to all the area within its parent or ancestor widget's clip. If there's no clip, the filter will be applied to the full screen. The results of
api.flutter.dev
Flutter에서 뒷배경을 Blur 처리하고 싶을 때, BackdropFilter를 사용하여 처리할 수 있다.
사용법은 다음과 같다.
BackdropFilter(
  filter: ImageFilter.blur(sigmaX: 10, sigmaY: 10), // ImageFilter를 이용해 필터를 적용한다.
  child: // child 위젯을 둘러싼 위젯에 filter가 적용된다(child는 깨끗히 보인다는 말).
)
참고로 Stack에서 사용할 때에는, 전체화면에 Fliter가 적용될 수 있다. 그 때에는

ClipRect를 사용하여 방지할 수 있다.
다음은 전체소스이다.
[전체소스]
import 'dart:ui';

import 'package:flutter/material.dart';

void main() => runApp(MyApp());

class MyApp extends StatefulWidget {
  @override
  State<MyApp> createState() => _MyAppState();
}

class _MyAppState extends State<MyApp> {
  bool isCroped = false;

  @override
  Widget build(BuildContext context) {
    final title = 'blur 예제';

    Widget testItem() {
      return Image.network(
          "https://cdn1.epicgames.com/item/ue/01%20-%20City_05_1080p_v1_1920x1080-3cec0289d8c77eccb37aa197e9e7f537?resize=1&w=1920");
    }

    return MaterialApp(
      title: title,
      home: Scaffold(
        floatingActionButton: FloatingActionButton(
          onPressed: () {
            setState(() {
              isCroped = !isCroped;
            });
          },
          backgroundColor: Color.fromARGB(255, 15, 71, 17),
          child: const Icon(Icons.change_circle),
        ),
        body: Stack(
          children: [
            ListView(
              children: <Widget>[
                for (var i = 0; i < 10; i++) ...{
                  Column(
                    children: [testItem()],
                  )
                }
              ],
            ),
            blurWidget(),
          ],
        ),
      ),
    );
  }

  Widget blurWidget() {
    Widget getClipBlur(Widget w) {
      return Center(
        child: ClipRect(
            child: SizedBox(
                height: 200,
                width: double.infinity,
                child: BackdropFilter(
                  filter: ImageFilter.blur(sigmaX: 10, sigmaY: 10),
                  child: w,
                ))),
      );
    }

    BackdropFilter getFullBlur() {
      return BackdropFilter(
          filter: ImageFilter.blur(sigmaX: 10, sigmaY: 10),
          child: Center(
              child: Text(
            "blur 전체",
            style: TextStyle(fontSize: 20),
          )));
    }

    return (isCroped)
        ? getFullBlur()
        : getClipBlur(Center(
            child: Text("blur 영역",
                style: TextStyle(fontSize: 20, color: Colors.white))));
  }
}
'Source code or Tip > Flutter & Dart' 카테고리의 다른 글
| [Flutter tip] Flutter key 사용 - Quick summary (0) | 2022.08.05 |
|---|---|
| [flutter] listView(Column)안에 list, Grid, pageView 넣기 (0) | 2022.08.04 |
| [Flutter] Transform.translate를 이용한 좌표이동 - 영역침범하기 (0) | 2022.07.28 |
| [Flutter] Widget에 그라데이션(Gradation) 효과주기 - ShaderMask, BoxDecoration (0) | 2022.07.28 |
| [Flutter link] ListView Scroll 관련 링크 (0) | 2022.07.24 |
'Source code or Tip/Flutter & Dart' Related Articles
more


Comments