
| 일 | 월 | 화 | 수 | 목 | 금 | 토 |
|---|---|---|---|---|---|---|
| 1 | 2 | 3 | ||||
| 4 | 5 | 6 | 7 | 8 | 9 | 10 |
| 11 | 12 | 13 | 14 | 15 | 16 | 17 |
| 18 | 19 | 20 | 21 | 22 | 23 | 24 |
| 25 | 26 | 27 | 28 | 29 | 30 | 31 |
- 코틀린
- 명언모음
- jetpack compose
- FSM
- 공자명언
- 소울칼리버6
- Streaming
- 벤자민플랭클린
- ASMR
- 공부집중
- 이모지
- 이모지메모
- androidx
- Freesound
- DART
- Flutter
- recyclerview
- kotlin
- 오픈소스
- Firebase
- 장자명언
- Linux
- 파이썬
- Android
- 좋은글필사하기
- 명심보감
- Coroutine
- 1인개발자
- javascript
- ChatGPT
- Today
- Total
Vintage appMaker의 Tech Blog
Android App shortcut 만들기 본문
Android App shortcut 만들기
VintageappMaker 2020. 12. 24. 12:22📢 구글 개발자 페이지
Create shortcuts | Android 개발자 | Android Developers
Shortcuts deliver specific types of content to your users by helping them quickly access parts of your app. How you deliver content with shortcuts depends on your use case and whether the shortcut's context is app-driven or user-driven. Although a static s
developer.android.com
App shortcut은 Android 7.0이상부터 지원되는 기능이다.
홈 스크린의 아이콘을 길게 누르면 팝업메뉴가 나오고 거기에서
원하는 기능을 선택할 수 있다.
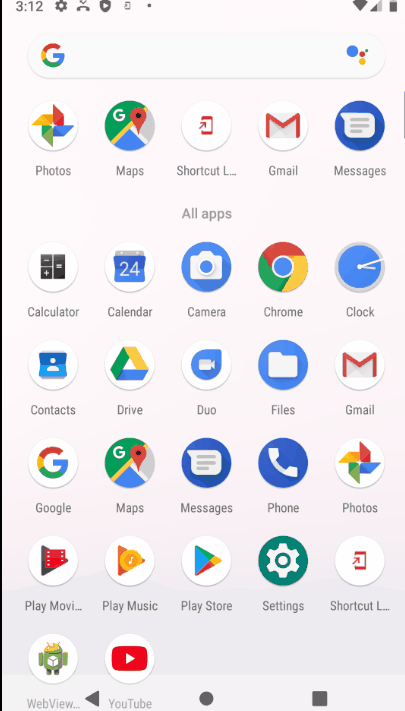
위의 캡쳐는 실제 마켓에 올라간 shortcut Launcher라는 앱에 적용한 예이다.
static하게 XML만 정보를 수정했다.
적용하는 방법은
1. AndroidManifest.xml의 최초실행되는 Activity에 다음과 같이 입력한다.
<activity
        android:screenOrientation="portrait"
        android:name="com.psw.ultrashortcut.SplashActivity"
        android:label="@string/app_name" >
        <intent-filter>
            <action android:name="android.intent.action.MAIN" />
            <category android:name="android.intent.category.LAUNCHER" />
        </intent-filter>

        <meta-data android:name="android.app.shortcuts"
            android:resource="@xml/shorcut" />
</activity>
위의 메타테그에서 수정될 부분은 숏컷 정보를 입력할 shortcut.xml의 위치이다.
res/xml/shorcut.xml에 원하는 메뉴정보와 선택시 이동할 activity를 지정하면 된다.
<shortcuts xmlns:android="http://schemas.android.com/apk/res/android">
    <shortcut
        android:shortcutId="search"
        android:enabled="true"
        android:icon="@drawable/ic_baseline_search_24"
        android:shortcutShortLabel="@string/shortcut_search_label"
        android:shortcutLongLabel="@string/shortcut_search_label"
        android:shortcutDisabledMessage="@string/shortcut_search_label">
        <intent
            android:action="com.psw.ultrashortcut.SEARCH"
            android:targetPackage="com.psw.ultrashortcut"
            android:targetClass="com.psw.ultrashortcut.MainPopup2" />
    </shortcut>

    <shortcut
        android:shortcutId="add"
        android:enabled="true"
        android:icon="@drawable/plus"
        android:shortcutShortLabel="@string/shortcut_add_label"
        android:shortcutLongLabel="@string/shortcut_add_label"
        android:shortcutDisabledMessage="@string/shortcut_add_label">
        <intent
            android:action="com.psw.ultrashortcut.ADD"
            android:targetPackage="com.psw.ultrashortcut"
            android:targetClass="com.psw.ultrashortcut.MainPopup" />
    </shortcut>

</shortcuts>
참고로 shortcutShortLabel, shortcutLongLabel, shortcutDisabledMessage에 들어갈 문자열은
반드시 @string에서 관리하도록 한다. 하드코딩으로 입력하면 에러가 발생한다.
여기서 주의깊게 보아야할 것은 <intent/> 부분이며 이는 메뉴를 선택시, 이동할 Activity나 컴포넌트 정보를 입력한다. 자세한 것은 개발자 문서를 참고하면 된다.
'Source code or Tip > Android(Java, Kotlin)' 카테고리의 다른 글
| [kotlin] associate를 이용한 list → Map (0) | 2020.12.29 |
|---|---|
| Android 앱에 쿠팡파트너 배너달기 (0) | 2020.12.25 |
| kotlin에서 xml의 ID로 변수를 자동으로 읽어오지 못할 때 (0) | 2020.12.22 |
| [Android] 커스텀 폰트 사용시, 강제로 TextView의 패딩이 들어가는 현상 (0) | 2020.12.14 |
| ADB를 이용한 Android와 PC 통신 (0) | 2020.12.13 |


