
| 일 | 월 | 화 | 수 | 목 | 금 | 토 |
|---|---|---|---|---|---|---|
| 1 | 2 | 3 | 4 | 5 | 6 | |
| 7 | 8 | 9 | 10 | 11 | 12 | 13 |
| 14 | 15 | 16 | 17 | 18 | 19 | 20 |
| 21 | 22 | 23 | 24 | 25 | 26 | 27 |
| 28 | 29 | 30 | 31 |
Tags
- 장자명언
- androidx
- 이모지
- jetpack compose
- 공자명언
- Freesound
- bash
- 소울칼리버6
- 이모지메모
- DART
- Coroutine
- 오픈소스
- Flutter
- 명심보감
- recyclerview
- Linux
- 코틀린
- ASMR
- 1인개발자
- 좋은글필사하기
- 명언모음
- Firebase
- 벤자민플랭클린
- 파이썬
- Streaming
- Android
- kotlin
- 공부집중
- FSM
- 넷플릭스
Archives
- Today
- Total
Vintage appMaker의 Tech Blog
[Flutter] visibility 설정위젯 (visible, invisible, gone 효과) 본문
Source code or Tip/Flutter & Dart
[Flutter] visibility 설정위젯 (visible, invisible, gone 효과)
VintageappMaker 2022. 6. 24. 17:14
Android에서는 View를 보임(visible), 안보임(invisible), 공간없이 안보임(gone)과 같은 값을 visibility 속성에 대입하여 모든 view에서 값에서 사용할 수 있다. 그러나 Flutter는 Visibility widget을 둘러쌓은 후 사용할 수 있다.
Visibility class - widgets library - Dart API
Whether to show or hide a child. By default, the visible property controls whether the child is included in the subtree or not; when it is not visible, the replacement child (typically a zero-sized box) is included instead. A variety of flags can be used t
api.flutter.dev
Visibility 위젯에서
visible: false/true를 통해 화면을 보여줄 것인지 숨길 것인지를 설정할 수 있다(android의 visible/invisble).
그리고 원래 위젯의 공간을 유지 후, 화면을 안보여주고 싶다면(android의 invisible)
다음과 같이 필드값을 설정하면 된다.
visible: false,
maintainSize: true,
maintainAnimation: true,
maintainState: true
다음은 간단한 예제의 전체소스이다.
import 'package:flutter/material.dart';
void main() {
runApp(const MyApp());
}
class MyApp extends StatelessWidget {
const MyApp({Key? key}) : super(key: key);
// This widget is the root of your application.
@override
Widget build(BuildContext context) {
return MaterialApp(
title: 'Visibility Test',
theme: ThemeData(
primarySwatch: Colors.blue,
),
home: const VisiblityTestPage(title: 'Visibility Test'),
);
}
}
class VisiblityTestPage extends StatefulWidget {
const VisiblityTestPage({Key? key, required this.title}) : super(key: key);
final String title;
@override
State<VisiblityTestPage> createState() => _VisiblityTestPageState();
}
class _VisiblityTestPageState extends State<VisiblityTestPage> {
@override
Widget build(BuildContext context) {
return Scaffold(
appBar: AppBar(
title: Text(widget.title),
),
body: Center(
child: SingleChildScrollView(
child: Expanded(
child: Column(
mainAxisAlignment: MainAxisAlignment.center,
children: <Widget>[
Text(
'1',
style: Theme.of(context).textTheme.headline4,
),
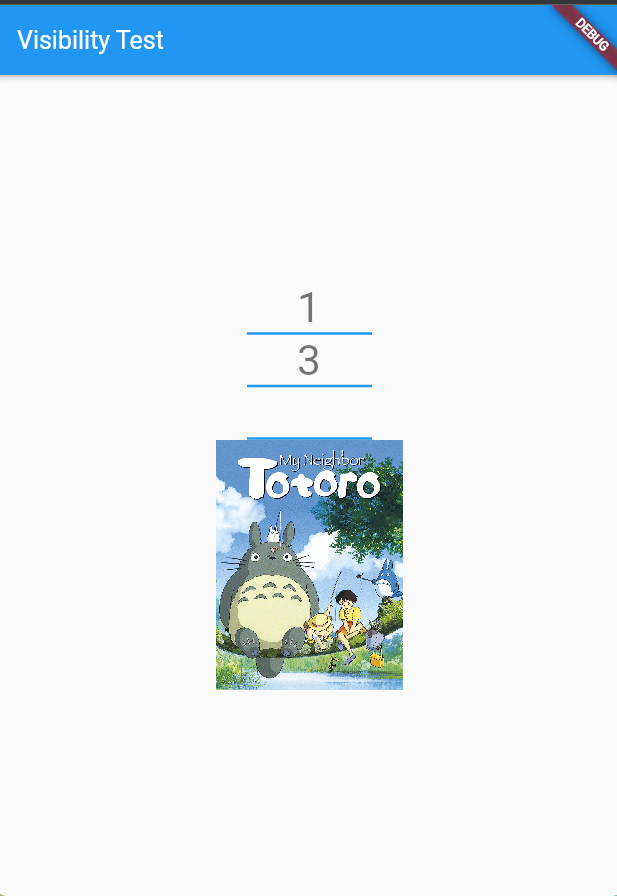
Container(color: Colors.blue , child: SizedBox(width: 100, height: 2,) ),
Visibility(
visible: false,
child: Text(
'2',
style: Theme.of(context).textTheme.headline4,
),
),
Text(
'3',
style: Theme.of(context).textTheme.headline4,
),
Container(color: Colors.blue , child: SizedBox(width: 100, height: 2,) ),
Visibility(
visible: false,
maintainSize: true,
maintainAnimation: true,
maintainState: true,
child: Text(
'4',
style: Theme.of(context).textTheme.headline4,
),
),
Container(color: Colors.blue , child: SizedBox(width: 100, height: 2,) ),
Visibility(
visible: false,
replacement: SizedBox( width : 200, height:200, child: Image.network("https://images-na.ssl-images-amazon.com/images/S/pv-target-images/02ef2b75bf6c39dec48c636c8dc9d0e4252601800eec9e15c8a266fc46150b00._RI_V_TTW_.jpg")),
child: Text(
'4',
style: Theme.of(context).textTheme.headline4,
),
),
],
),
),
),
) // This trailing comma makes auto-formatting nicer for build methods.
);
}
}
'Source code or Tip > Flutter & Dart' 카테고리의 다른 글
| [Flutter] setState 없이 화면변경 - ValueListenableBuilder (0) | 2022.06.27 |
|---|---|
| [Flutter] Widget의 overflowed pixcels error 처리 (0) | 2022.06.25 |
| [dart] List를 이용한 Function table 활용 - case & 순차적 함수처리 (0) | 2022.06.16 |
| [Flutter] keyboard 위에 TextField 노출시키기 (0) | 2022.06.08 |
| [Flutter] Dio, retrofit을 이용한 github API 예제 (0) | 2022.05.23 |
'Source code or Tip/Flutter & Dart' Related Articles
more


Comments