
| 일 | 월 | 화 | 수 | 목 | 금 | 토 |
|---|---|---|---|---|---|---|
| 1 | 2 | 3 | 4 | 5 | 6 | |
| 7 | 8 | 9 | 10 | 11 | 12 | 13 |
| 14 | 15 | 16 | 17 | 18 | 19 | 20 |
| 21 | 22 | 23 | 24 | 25 | 26 | 27 |
| 28 | 29 | 30 | 31 |
- 좋은글필사하기
- ASMR
- androidx
- Streaming
- 벤자민플랭클린
- 파이썬
- Freesound
- Android
- Linux
- kotlin
- 이모지
- 명심보감
- 공자명언
- 장자명언
- 명언모음
- bash
- recyclerview
- 소울칼리버6
- 오픈소스
- DART
- 공부집중
- Firebase
- Flutter
- Coroutine
- 1인개발자
- jetpack compose
- 이모지메모
- 넷플릭스
- FSM
- 코틀린
- Today
- Total
Vintage appMaker의 Tech Blog
[Android] SQLite를 편하게, Room 빠르게 사용하기 본문
[Android] SQLite를 편하게, Room 빠르게 사용하기
VintageappMaker 2022. 4. 15. 11:52
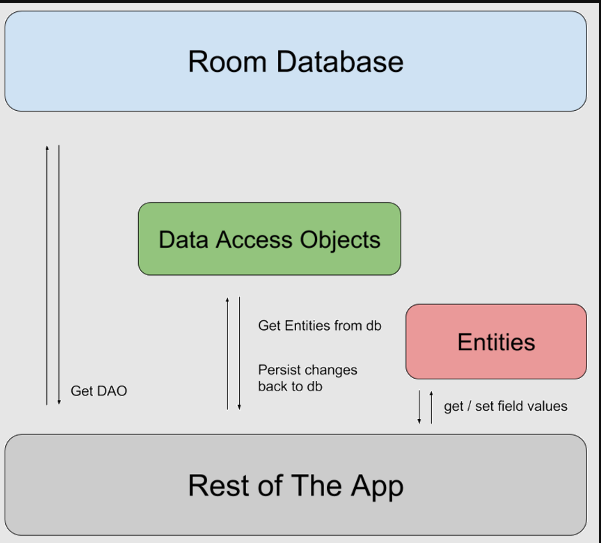
Room은 Android에서 데이터베이스를
ORM(Object Relational Mapping)으로
편하게 사용할 수 있도록 지원해주는 라이브러리이다
구조적으로는 SQLite의 위에서 편리한 기능을 처리해주는 Wrapper의 성격을 가지고 있다.
ROOM을 사용하기 위해서는 다음과정을 거쳐야 한다.
- gradle 설정
- entity 정의(DAO)
- database 초기화
- 코루틴으로 사용
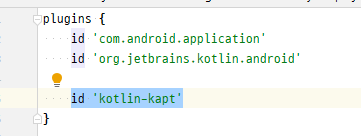
1. gradle 설정
gradle 설정시 room에서는 kotlin의 annotation이 달라지므로 플러그인으로 kapt를 정의해야 한다.
그리고 room과 코루틴 라이브러리를 정의한다. 참고로 코루틴의 경우, core와 android의 버전을 동일시 하지 않으면 에러가 발생할 경우가 있다.
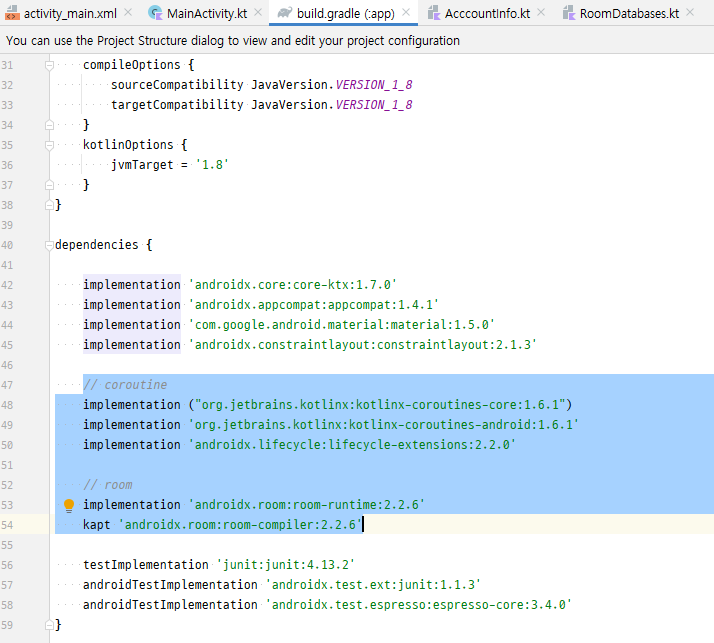
build.gradle(app)
// coroutine
implementation ("org.jetbrains.kotlinx:kotlinx-coroutines-core:1.6.1")
implementation 'org.jetbrains.kotlinx:kotlinx-coroutines-android:1.6.1'
implementation 'androidx.lifecycle:lifecycle-extensions:2.2.0'

// room
implementation 'androidx.room:room-runtime:2.2.6'
kapt 'androidx.room:room-compiler:2.2.6'
2. entity 정의(DAO)
entity는 database의 table에 해당한다. dao(data access object)는 테이블을 액세스하기 위한
- @Entity annotation으로 "테이블"을 정의한다.
- @PrimaryKey annotation으로 프라이머리 키를 정의가능
- @Dao annotation으로 Data(=entities)를 액세스할 수 있는 클래스를 정의한다.
- @Dao로 정의된 클래스에서는 추가, 삭제, 업데이트, 쿼리(질의문) annotation으로 메소드를 정의할 수 있다.
package com.psw.quicktest
import androidx.room.*

@Entity
data class AcccountInfo(
    var account  : String,
    var money    : Int,
    var idNumber : String
){
    @PrimaryKey(autoGenerate = true) var id: Int = 0
}

@Dao
interface AccountDao {
    @Insert
    fun insert(user: AcccountInfo)

    @Update
    fun update(user: AcccountInfo)

    @Delete
    fun delete(user: AcccountInfo)

    // using query
    @Transaction
    @Query("SELECT * FROM AcccountInfo")
    fun getAll(): List<AcccountInfo>

    @Transaction
    @Query("delete FROM AcccountInfo")
    fun deleteAll()

}
3. database 초기화
- @Database annotation에서 테이블에 해당하는 entities에 사용할 entity 클래스를 열거한다.
- @Database annotation에서 version에 database 버전(개발자가 정의한)을 정의한다.
- RoomDatabase를 상속받는다. abstract로 상속받는다. Dao에 해당하는 interface도 이곳에서 선언한다.
- 일반적으로 static한 메소드를 제공하여 singleton 형식으로 객체를 넘겨준다. 이때 Room.databaseBuilder를 이용하여 사용하고자 하는 클래스의 정보를 넘겨준다.
package com.psw.quicktest
import android.content.Context
import androidx.room.Database
import androidx.room.Room
import androidx.room.RoomDatabase
// database 초기화
@Database(entities = [AcccountInfo::class], version = 1)
abstract class AppDatabase: RoomDatabase() {
abstract fun accountDao(): AccountDao
companion object {
private var instance: AppDatabase? = null
@Synchronized
fun getInstance(context: Context): AppDatabase? {
if (instance == null) {
synchronized(AppDatabase::class){
instance = Room.databaseBuilder(
context.applicationContext,
AppDatabase::class.java,
"this-app-databases"
).build()
}
}
return instance
}
}
}
// Google migration 예제코드
/*
val MIGRATION_1_2 = object : Migration(1, 2) {
override fun migrate(database: SupportSQLiteDatabase) {
database.execSQL("CREATE TABLE `Fruit` (`id` INTEGER, `name` TEXT, " +
"PRIMARY KEY(`id`))")
}
}
val MIGRATION_2_3 = object : Migration(2, 3) {
override fun migrate(database: SupportSQLiteDatabase) {
database.execSQL("ALTER TABLE Book ADD COLUMN pub_year INTEGER")
}
}
Room.databaseBuilder(applicationContext, MyDb::class.java, "database-name")
.addMigrations(MIGRATION_1_2, MIGRATION_2_3).build()
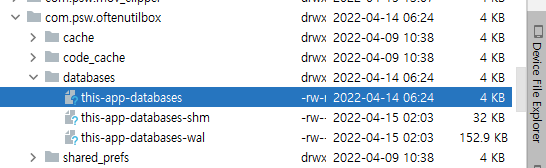
* */Room.databaseBuilder를 사용하여 데이터베이스를 생성했을 경우, Device File Exploerer를 사용하면 해당이름으로 Database 파일이 생성된 것을 볼 수 있다.
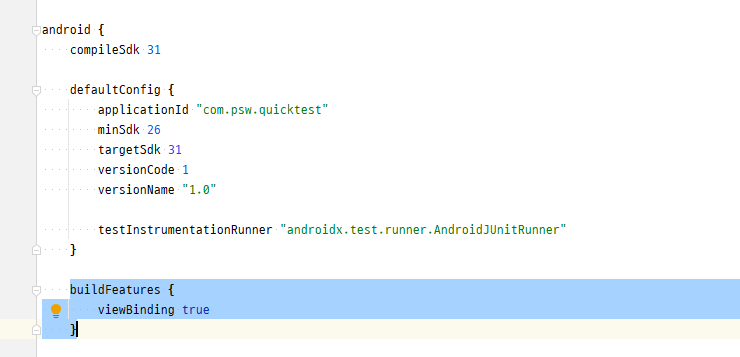
4. 코루틴으로 사용
Activity에서 viewBinding을 사용하기 위해서 다음과 같이 gradle에 설정을 한다.
[activity_main.xml]
<?xml version="1.0" encoding="utf-8"?>
<androidx.constraintlayout.widget.ConstraintLayout xmlns:android="http://schemas.android.com/apk/res/android"
    xmlns:app="http://schemas.android.com/apk/res-auto"
    xmlns:tools="http://schemas.android.com/tools"
    android:layout_width="match_parent"
    android:layout_height="match_parent">

    <LinearLayout
        android:orientation="vertical"
        android:layout_width="match_parent"
        android:layout_height="match_parent">

        <Button
            android:id="@+id/btnDropTable"
            android:text="drop table"
            android:layout_width="match_parent"
            android:layout_height="wrap_content"/>

        <TextView
            android:id="@+id/txtMessage"
            android:layout_weight="1"
            android:gravity="center"
            android:layout_width="match_parent"
            android:layout_height="wrap_content"/>


    </LinearLayout>

</androidx.constraintlayout.widget.ConstraintLayout>
그리고 MainActivity의 소스는 다음과 같다.
package com.psw.quicktest

import androidx.appcompat.app.AppCompatActivity
import android.os.Bundle
import com.psw.quicktest.databinding.ActivityMainBinding
import kotlinx.coroutines.CoroutineScope
import kotlinx.coroutines.Dispatchers
import kotlinx.coroutines.async
import kotlinx.coroutines.launch

class MainActivity : AppCompatActivity() {
    lateinit var binding : ActivityMainBinding
    override fun onCreate(savedInstanceState: Bundle?) {
        super.onCreate(savedInstanceState)
        binding = ActivityMainBinding.inflate(layoutInflater)

        // Room test
        var db = AppDatabase.getInstance(applicationContext)


        db?.apply {
            doDBRequest { accountDao().insert(AcccountInfo("test", 2000000, "EacDDE-2398-bC-lk-cdb89")) }
        }

        binding.apply {

            // DB는 비동기처리 필수
            showDBInfo(db)

            btnDropTable.setOnClickListener {
                doDBRequest {
                    db!!.accountDao().deleteAll()
                    showDBInfo(db)
                }
            }

        }

        setContentView(binding.root)

    }

    // DB는 다른 쓰레드에서 처리해주어야 한다.
    fun doDBRequest(fnAction : ()-> Unit = {}){
        CoroutineScope(Dispatchers.IO).launch {
            fnAction()
        }
    }

    fun doDBRequestAndUI(dbReq: ()->Any, uiAction : (Any)->Unit){
        CoroutineScope(Dispatchers.Main).launch {
            val accounts = CoroutineScope(Dispatchers.IO).async {
                dbReq()
            }.await()

            uiAction(accounts)
        }
    }

    private fun ActivityMainBinding.showDBInfo(db: AppDatabase?) {

        doDBRequestAndUI({
            db!!.accountDao().getAll()
        }, {
                accounts ->
            txtMessage.text = ""
            var acc = (accounts as List<AcccountInfo>)
            acc?.forEach {
                txtMessage.text = "${txtMessage.text}\n${it}"
            }
        })

    }
}
SQLIte를 직접사용하는 것보다 편한 점도 있지만, 코루틴을 사용하는 것이 필수에 가까우므로 단순히 정보를 저장하는 목적이라면 JSON정보를 File 형식으로 직렬화하여 저장하는 것을 추천한다.
'Source code or Tip > Android(Java, Kotlin)' 카테고리의 다른 글
| [Android] 새로운 프로젝트로 jetpack compose를 고민한다면 한 번쯤 고민하는 내용. (0) | 2022.05.08 |
|---|---|
| kotlin에서 DI 빠르게 이해하기 (0) | 2022.04.16 |
| [Android] BottomNavigationView의 onBackPressed처리 (0) | 2022.04.08 |
| [Android 12] Pending Intent 적용정책 (0) | 2022.04.04 |
| [링크] Android Espresso 자료모음 (0) | 2022.03.20 |


